Before you get started, you’ll need to know how to draw in p5. If you have not been through our p5 drawing tutorial, you can find that here.
Christopher Cotton recently joined our Web Development and Software Engineering students to show them how to create a game with p5. This workshop is based on a class he’s developed called Mr. Kitty Codes with video tutorials and a book coming soon. You can watch the video tutorials on the Mr. Kitty Codes YouTube channel and get notified when the book comes out at MrKittyCodes.com. Thanks to Christopher for sharing his knowledge with our students and for allowing us to share it here on our blog.
This series assumes you have some basic JavaScript knowledge.
Now that you know how to draw, how do you animate it?
Christopher shares that “animation is where you erase what you have in one spot, you move it a little bit, and then you draw it again. And you do that as fast as you can.” The result? A moving object!
It’s the digital equivalent of drawing a cartoon in a flip book.
Let’s jump back to our p5.js web editor.
Tip: Don’t forget to push play and check auto-refresh if you’ve left and come back to the editor.
(You can also watch the video about animation.)
First, if you’re continuing from our drawing tutorial, clear out all the functions in your draw function so that it looks like this:
function setup () {
  createCanvas(400, 400);
}
function draw(){
}
If you haven’t yet already, push the play button and select “Auto-refresh” so that you can see your drawings as you go along.
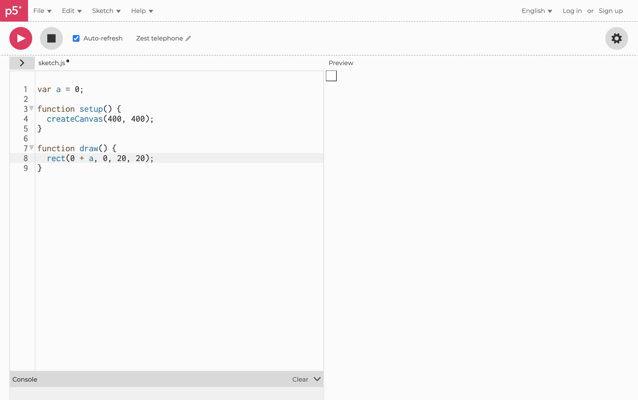
Now let’s draw a small rectangle.
rect(0,0,20,20);
“Our goal is to get this rectangle to move to the right across the screen,” explains Christopher. “Right now, every time we run the code, it’s drawing the rectangle in the exact same place. So we need to add a variable to get it to move.”
To declare a variable in JavaScript, you need var, we’ll call it a and set it to 0. This will get placed before our setup function.
var a = 0;
With the variable declared, we can now go to our rectangle in the draw function and add the variable.
rect(0+a,0,0,20,20);
Does your code look like this?
There is one more step to get the rectangle to move. We need to add a formula to increase the variable a every time it runs. Let’s try moving our rectangle by 5 pixels every time the code runs. (Remember: the code will run in a loop indefinitely.) If we set a = 5; we’ll move the rectangle only once, but by using the formula a = a + 5;, a will move the rectangle by 5 pixels continuously.
var a=0;
function setup () {

  createCanvas(400, 400);
}
`function draw() {
	rect(0+a,0,20,20);
a = a+5;
}
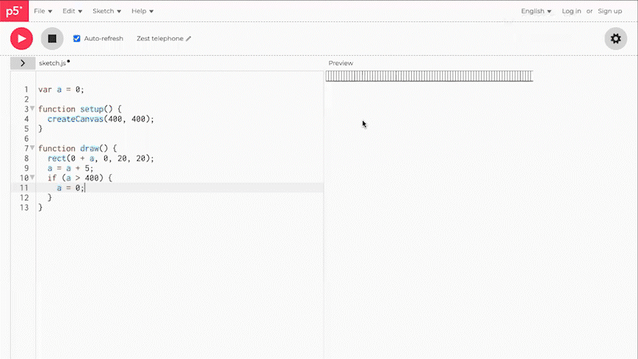
Now you should see the rectangle move across the screen and leave a trail. If you don’t want to see the trail, you can add a background color as we did in our last tutorial.
As the code is written now, the rectangle goes off the screen and never comes back. So, what if you don’t want it to go off the screen, but instead return to where it started (over and over again)?
If we simply write a = 0; after a = a + 5;, it will reset the rectangle to the beginning, but it no longer moves. So to keep it moving, we need to introduce an if statement.
If you’re not familiar with an if/else statements in JavaScript, w3schools.com defines it as:
The if/else statement executes a block of code if a specified condition is true. If the condition is false, another block of code can be executed.
The if/else statement is a part of JavaScript's "Conditional" Statements, which are used to perform different actions based on different conditions.
For our animation, we’ll focus on if statements, but you can learn more about if/else statements on w3schools.com.
A simple way to think about if statements for animation in p5 is to break it into two questions:
- When/Where do you want it to happen? (Location)
- What do you want to do? (Action)
if (when do you want it to happen) {
 what you want to do;
}
Back to our example, if we want the rectangle to go back to the beginning, or 0, when it reaches the end of the line, or is > 400 (our canvas size), the if statement looks like this:
if (a > 400) {
 a = 0;
}
Pro tip: Make sure your if statement is inside the curly braces of your draw function, shown below.
Now play around with the values in the if statement and watch how the rectangle responds.
What happens if you change a > 400 to a > 200?
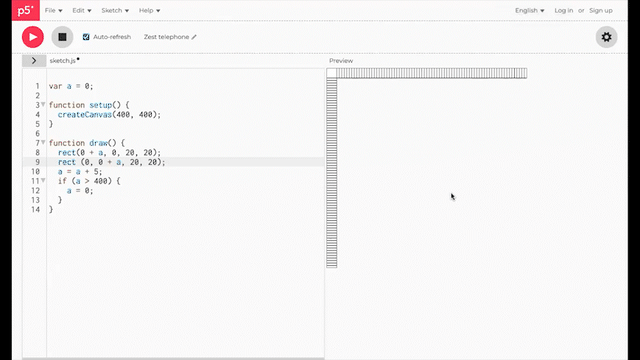
Ok. Now try to create a second rectangle that moves down the y-axis to the bottom of the screen.
Jump to solution: Rectangle moves down the y-axis.
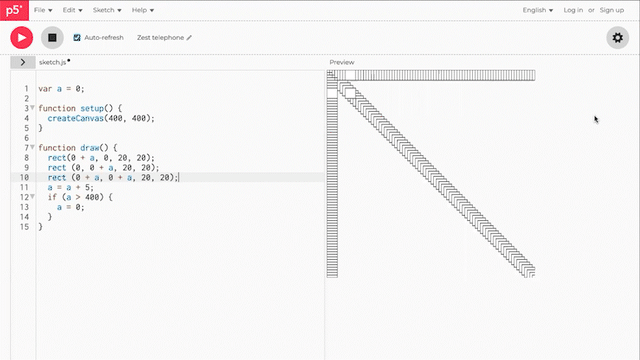
What about a rectangle that moves diagonally across the screen?
Jump to solution: rectangle moves diagonally across the screen.
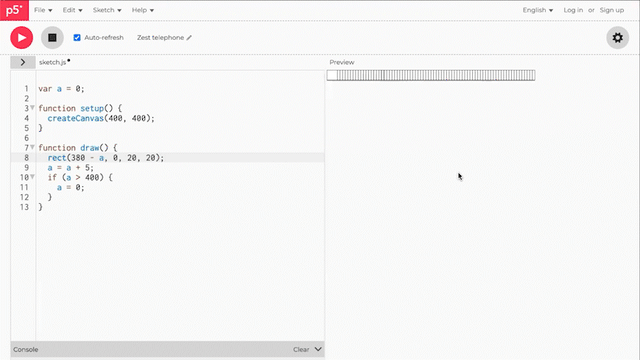
What if you wanted to move a rectangle from right to left or from the bottom to the top?
If you add your variable to make the object go from left to right or from the top to bottom, the reverse of that would be to subtract your variable. Don’t forget to start your box on the right or bottom of your canvas.
Pro Tip: When starting your object at the right or bottom of your canvas, set the start value for less than your canvas size so you can see the object.
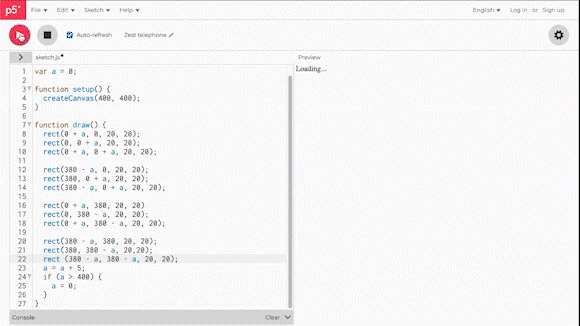
Here’s another challenge. Can you get a rectangle to move from all 4 corners of the canvas at once?
Jump to solution: Rectangles move from all 4 corners.
You can also go watch a video of how to complete the animation challenge.
Now that you’ve mastered animating a rectangle, it’s time to build a rhythm game!
Every good developer knows that you need to take a break every once and awhile. Keep practicing your animation skills and we’ll be back tomorrow to show you how to build a rhythm game.
Jump to our next post to get started.
Solutions
Rectangle moves down the y-axis
Rectangle moves diagonally across the screen
Rectangles move from all 4 corners