Christopher Cotton recently joined our Web Development and Software Engineering students to show them how to create a game with p5. This workshop is based on a class he’s developed called Mr. Kitty Codes with video tutorials and a book coming soon. You can watch the video tutorials on the Mr. Kitty Codes YouTube channel and get notified when the book comes out at MrKittyCodes.com. Thanks to Christopher for sharing his knowledge with our students and for allowing us to share it here on our blog.
This series assumes you have some basic JavaScript knowledge.
What is p5?
According to p5js.org, p5.js is a “JavaScript library for creative coding, with a focus on making coding accessible and inclusive for artists, designers, educators and beginners.” It uses the metaphor of sketch and provides a full set of drawing functions - pretty useful!The beginning of understanding p5 starts with a trip back to math class. But don’t freak out – it’s not too complicated.
Remember the X-Axis and Y-Axis?
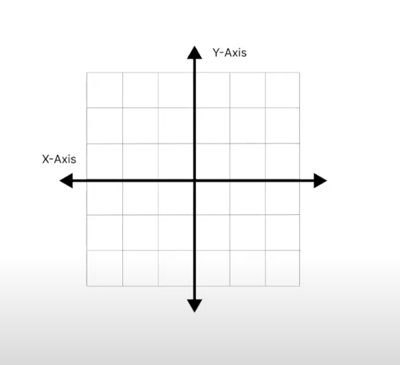
Instead of the axis being in the center (shown above), it’s going to start at the top left corner of your screen (shown below)
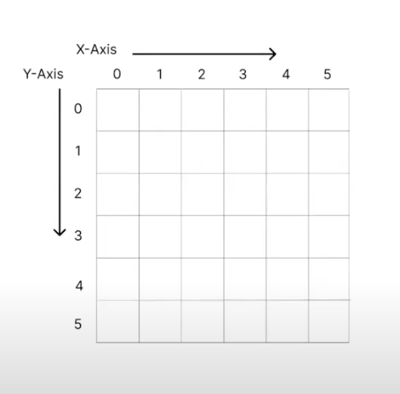
We’re going to learn to draw by using coordinates to fill in the pixels. If you remember plotting x and y coordinates in math class, you probably remember plotting a point. But when drawing on the computer, you’re actually filling in sections or pixels on the axis.
Learn better through video? You can also watch this in video form.
Using Functions To Draw
Before we can draw, we need an editor. Fortunately, there is a free one at editor.p5js.org. Go ahead and open that up in a new window so you can work on it side by side with this blog.
P5 always starts with the following functions.
function setup () {
  createCanvas(400, 400);
}
The next function you need is
function draw() {
  background(220);
}
When you open your p5 editor window, it should already have the code above ready to go.
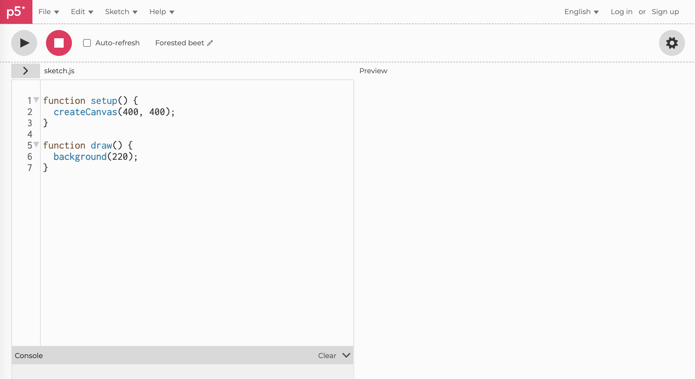
To get started, push the play button and select “Auto-refresh” so that you can see your drawings as you go along. You should now see a gray square. This is covering your canvas size of 400 x 400 pixels which is identified in the setup function. We’ll do our drawing in the draw function where you currently see “background” listed.
Coding Newbie tip: As you add functions, make sure you keep them within the curly brackets{ }afterfunction draw(). If they are outside of the curly brackets you will get an error message or the code won’t run as expected.
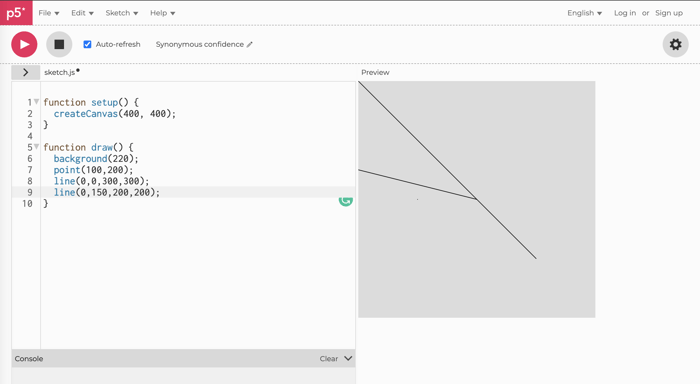
Let’s make our first mark, a point.
point (x, y);
I used point(100,200);.
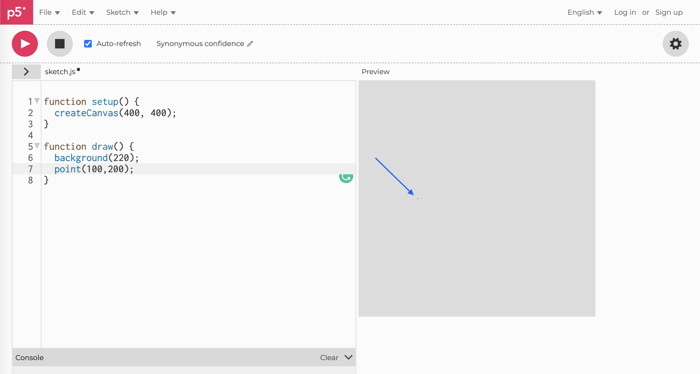
Did you just have to clean your screen to see where that point ended up? Me too! Points are not ideal as they can be too small to see, but it’s helpful to understand how they work as we learn more functions.
Ok, here’s one you’ll be able to see.
line (x1, y1, x2, y2);
x1 and y1 represent the starting point of your line and x2 and y2 represent the end point of your line.
Try drawing a couple of lines, like line(0,0,300,300); or line(0,150,200,200);, or pick a coordinate of your choosing.
Let’s try some shapes next.
rect (x, y, width, height);
x and y is your starting point, top left corner.
ellipse (x, y, width, height);
For an ellipse, x and y is the center of your ellipse.
I used rect(0,0,100,100); and ellipse(0,0,100,100) or choose some coordinates of your own.
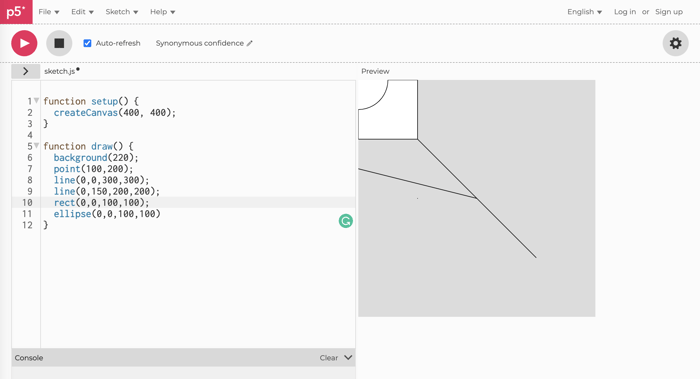
Wait! What’s happening here?
Why is the rectangle white? And what is that quarter of a circle? p5 is building your drawing one line (or layer) at a time. In the example above, after drawing the lines, it draws the rectangle and then the ellipse on top of the lines since they are in the same area (based on the coordinates we input). The rectangle and ellipse are also solid shapes, which is why they appear white. (Don’t worry, we can change the color later.) Why did the ellipse take a “bite” out of the rectangle? As mentioned above, the ellipse function starts in the center of the circle, whereas the rectangle function starts in the upper left corner.
There are other shapes you can create like a triangle or polygon and you can find those in the Reference section of your editor in the Help menu.
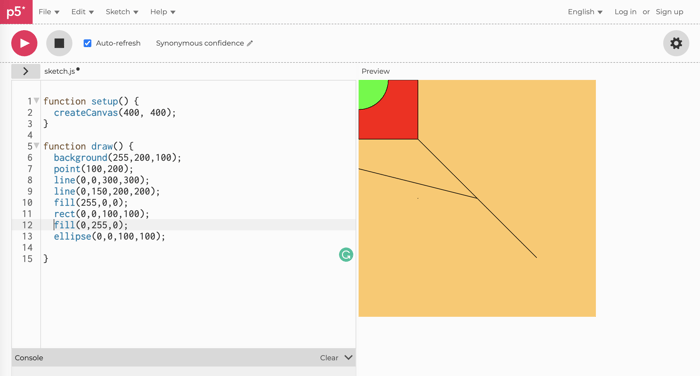
Are you ready for some color?
First, let’s learn a bit about what the numbers for color mean. (Learn better through video tutorials? Watch the video about colors here.) The numbers for colors go between 0 and 255 and it’s how much of that color you want in there. Color is determined by mixing red, green, and blue (or RGB) light. So background(255, 0, 0); will give you red. background(255, 255, 0); will give you yellow. But, wait? Don’t blue and green make yellow?
Mixing color on screen is not like mixing paint. Remember, we’re mixing light. If you were to go up to a large screen display at a football game, for instance, you would see the reds, greens, and blues that are making up all the additional colors. If you mix all colors together, background(255, 255, 255);, you will actually get white. When your color is using three of the same values for RGB, like 255 for white or 220 for gray in the example we’ve been using above, you can abbreviate it to a single number: background(255);
Go ahead and play with the background color in the editor a bit.
So far we’ve been using background(red, green, blue); to fill the background or canvas, but we can also fill objects, like our rectangle or ellipse.
fill(red, green, blue); - fill and object, such as a rectangle or an ellipse
Pro tip: List your color first and then your drawing.
What to color your line? Use stroke(red, green, blue);.
You can also widen your line or the line around the object with strokeWeight(50); - just change the 50 to the size you want.
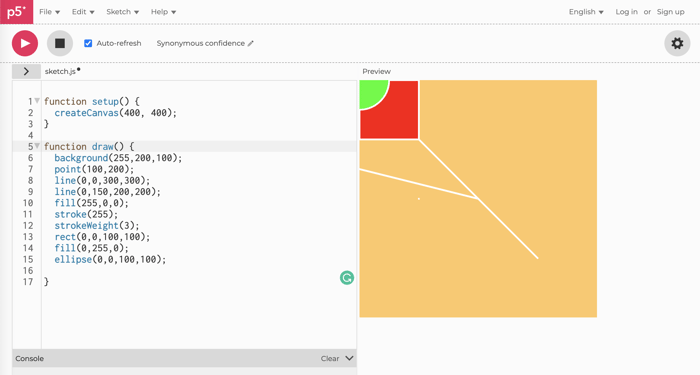
"I added stroke and strokeWeight above the rectangle function, so why did all my lines just turn white and get wider," you ask? The code loops around so if you set a color for an object in the middle of your code, it will become the color for everything else until you change it.
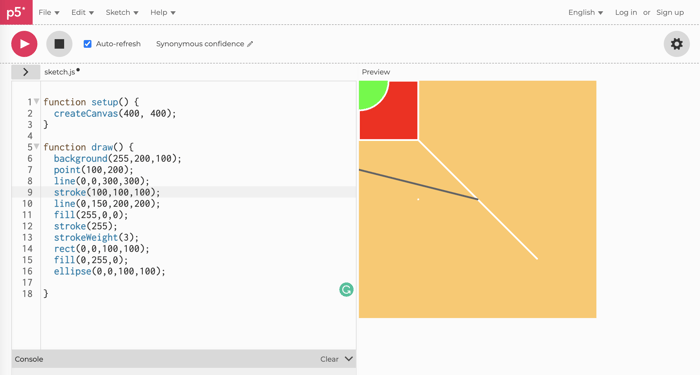
You’ll notice, by adding another stroke color (in line 9 above), it’s turned that line dark gray, but since there is a stroke color of white before the next object, a rectangle, all the other lines remain white.
To find the colors you want, check out this color picker from w3schools.com or find your favorite color picker online.
Play around with the color and drawing functions a bit.
Ready to animate? Jump to our next post to get started!